Reviewing tasks (Old)
Updated at July 9th, 2024
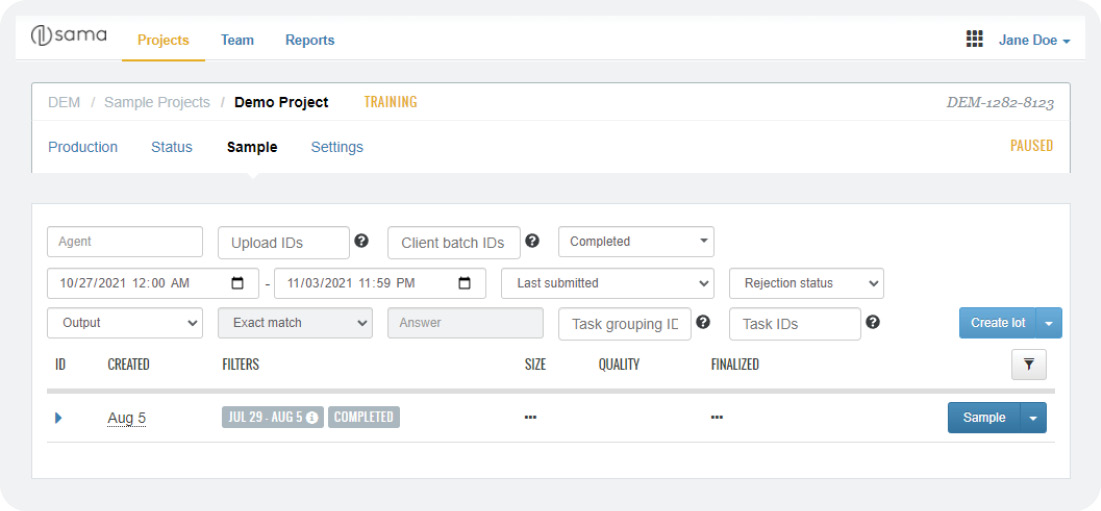
To access the Sample page, go to Projects > [your project] > Sample.
On this page, you can conduct a quality management process called sampling. During this process, you can create a "lot", which is a batch of tasks that you want to review as a group. You can then extract a "sample" from that lot, which simply a small subset of all the tasks in the lot, and review them.
If the tasks in the sample look good, you can approve the entire sample. However, if you find that the tasks in the sample aren't up to scratch, you can reject the entire sample and send it back to the annotator for rework, along with feedback about how they can improve.
Example
At the end of the day on Friday, you create a lot that contains all 100 tasks that were annotated this week. From this lot, you sample 10% of the tasks and review them for quality purposes. Unfortunately, you see that the annotation work just doesn't meet the required standards, and you send the entire lot back to the annotators for rework.
📘 Note
You cannot sample tasks completed by members of a different team, even if they are assigned to the same project.

Creating a lot
Before you can generate a sample, you must first create a lot. A lot is essentially just the pool of tasks from which you'll eventually pull out your sample.
Lots can either be created by using filters to query all the tasks in the system and include only the tasks that meet certain criteria, or by uploading a CSV to include only the tasks with specified task IDs.
Creating a lot using filters
Using filters can be a good way to search for all the tasks in the system that meet certain criteria. For example, you might want to look at just the tasks that were completed by a new annotator within the last week.
To create a lot using filters:
- Configure the filters to specify which tasks to include in the lot. Only the tasks that meet ALL the criteria will be included. For descriptions of each field, see the Filter fields section below.
- Click Create lot. The new lot will appear in the table and will show the filters that were used to create it in the Filters column.

Filter fields
Each of the filter fields is described in detail in the table below.

| Field | Description |
|---|---|
| A | Includes tasks that were worked on by the specified annotator. |
| B | Includes tasks with the specified upload IDs. These IDs are automatically generated when tasks are uploaded to the platform. To find the ID for a particular upload, go to Projects > Status > Tasks > Uploads. |
| C | Includes tasks with the specified client batch IDs. These IDs, which can be used to help clients organize similar tasks into batches, can be included as a project input. To find a particular batch ID, open the original upload file and check the IDs. |
| D | Includes all tasks that currently have any of the specified statuses. The options are: - Select all: Selects all statuses. - Completed: Tasks that have been submitted in the final step of the project. - Approved: Tasks that have been reviewed and approved. - Delivered: Tasks that have been exported and marked as delivered. - Acknowledged: Tasks that have been acknowledged by the client, either manually through the API or because the auto-acknowledgment delay set in the project settings has passed.Note: You cannot include In Progress tasks (which are not yet available for review) or Rejected tasks (which have automatically been returned to the queue and are unavailable for review). |
| E | The start date and time of the range used by field G. |
| F | The end date and time of the range used by field G. |
| G | Includes all tasks that had the specified action occur during the date and time range specified in fields E and F. The options are: - Created: Tasks that were created during the range. - Last submitted: Tasks that were last submitted by an annotator during the range. - Approved: Tasks that were reviewed and approved during the range. - Delivered: Tasks that were exported and marked as delivered during the range. - Acknowledged: Tasks that were acknowledged by the client during the range, either manually through the API or because the auto-acknowledgment delay set in the project settings passed. |
| H | Includes all tasks that have the specified rejection status: - Round 1 (never rejected): The task has never been rejected. - Rounds 2+ (previously rejected): The task has been rejected at least once and sent back to the beginning of the workflow for a second round of work. |
| I | Includes tasks that have a particular answer for the specified scene output, which can be selected from this drop-down. Shape (nested) outputs are not supported. In fields J and K, specify which answers to search for. |
| J | The desired answers to the output specified in field I. The options are: - Exact match: Answers that exactly match the value specified in field K. - Any answer: Any answers that are not null.If you leave this field blank, any answers that are null will be included. |
| K | The desired answer to the output specified in field I, if you selected Exact Match in field J. Depending on the type of output you selected, you may need to format your answer in a specific way. For more details, hover over the tooltip on this field. |
| L | Includes all tasks with the specified task group ID (for more info, see Grouping tasks). To find a particular task group ID, open the original upload file and check the IDs. |
| M | Includes all tasks with the specified task ID. These IDs are automatically created for each task when it is uploaded. To find a particular task ID, view that task in the workspace or go to Projects > Status > Tasks > Uploads. |
Creating a lot by CSV upload
A CSV upload can be the way to go if you already know exactly which tasks you want to include in a lot. Additionally, if you would like to create a lot from a wide variety of tasks that don't share common characteristics, you may not be able to configure filters that would return those tasks.
To create a lot by CSV upload:
-
Prepare a CSV file that has one row per task, with only a single column named "task_id" that contains the task ID of each task.
🚧 Warning
If your CSV file contains tasks that cannot be added to a lot, such as In Progress tasks (which are not yet available for review) or Rejected tasks (which have automatically been returned to the queue and are unavailable for review), those tasks will be ignored.
- Click on the arrow next to Create lot and click Create lot by CSV upload.

- In the Create lot window that appears, click Browse and select your prepared CSV file.
- Click Create lot. The new lot will appear in the table and will show CSV in the Filters column, to indicate that it was created by a CSV upload instead of filters.

Sampling a lot
From the lot that you created, you will now need to sample a certain percentage of those tasks to get an overview of the quality of the tasks within the lot. For example, if you have 100 samples, you probably don’t want to have to comb through each one individually — looking at just 5% of those tasks could likely give you a good idea of whether the tasks were done well or not.
🚧 Warning
Avoid including the same task in multiple samples. If this occurs, you may end up providing conflicting feedback for the task across multiple samples or creating confusing situations where a task has already been finalized in one sample, but still appears open for review in another.
To sample a lot:
- In the table, on the right of a row for a lot, click Sample.

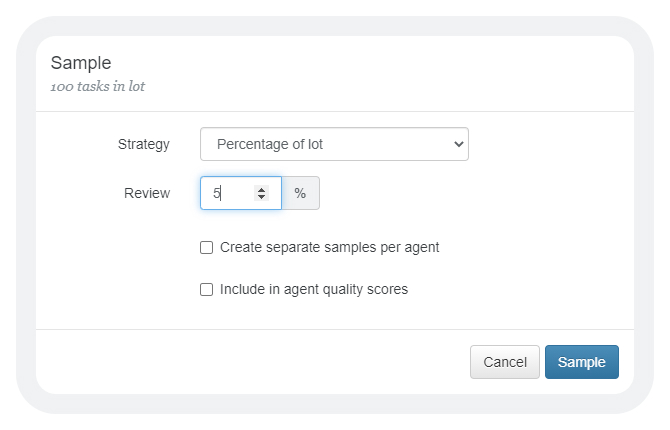
- In the Sample window that appears, configure the settings as desired. For details about each field, see the table below.

| Field | Description |
|---|---|
| Strategy | Determines how tasks are selected for inclusion in the sample. The options are: - Percentage of lot: Samples only the specified percentage of the total number of tasks in the lot. - Every N tasks: Samples only every Nth task of the total number of tasks in the lot. - Fixed number of tasks: Samples the specified number of tasks. - 100% in Creation Order: Samples all of the tasks in the lot, in the order that they were created (this is useful if the tasks are in sequence, such as when a video is uploaded frame by frame). |
| Create separate samples per agent | Creates a separate sample for each of the annotators who worked on the sampled tasks. Since projects can have multiple steps, different annotators may work on the same tasks in different steps. For example, you could end up with one sample for Laura and one sample for James, with both of those samples including a task that was worked on by Laura in Step A and by James in Step B. |
| Include in agent quality scores | Includes the sampled tasks in the reporting features in the Reports tab. |
- Click Sample.
The sample will appear as the next row in the table.
Filtering the samples in the table
Several options are available to filter the samples in the table. You can search for a particular sample by its sample ID, or show samples based on who originally created them.
To filter the samples:
- Click the filter icon at the top right of the table.
-
Configure the filter options as follows:
- Sample ID: Returns the sample with the specified sample ID.
- Created by: Me: Returns all samples that were created by you.
- Created by: My Team: Returns all the samples that were created by your team.
- Click View.

Viewing and/or reviewing a sample
You can view the tasks in a sample, as well as review each task if desired. By reviewing a task, you can approve or reject it, as well as leave a variety of feedback for the annotators if they need to re-annotate unsatisfactory work.
To view and/or review a sample:
- In the row for a sample, click View.

-
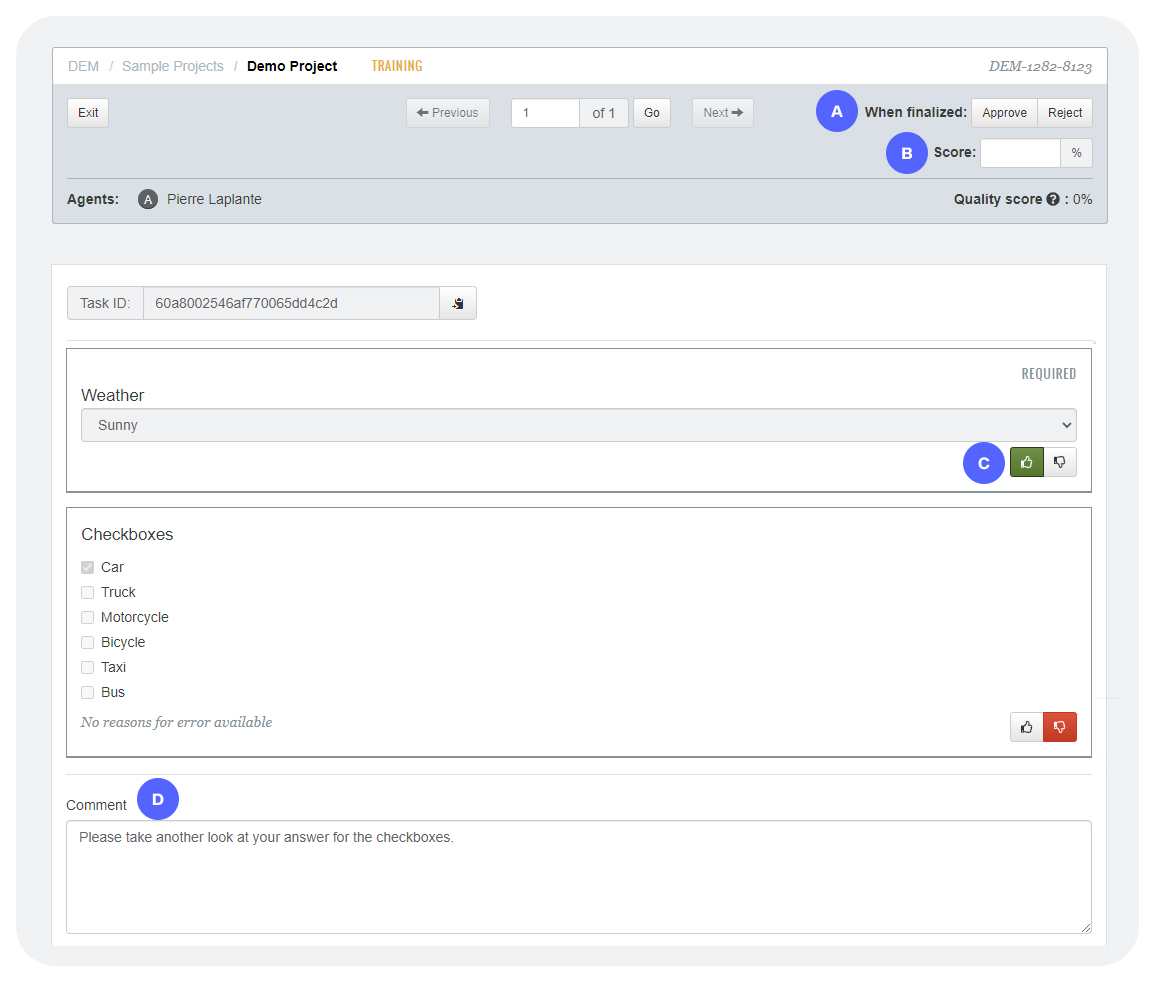
Review each task by performing one or more of the following actions:
a. Approve or reject the entire task by clicking Approve or Reject in the When finalized field.
b. Assign a score to the task by entering a percentage in the Score field.
c. Provide feedback on individual sections by clicking the thumbs up or thumbs down buttons.
d. Leave comments in the Comment field.

- If needed, click Previous or Next to navigate to another task in the sample.
- Click Exit when done.
Finalizing a lot
Finalizing a lot can be thought of as “submitting” the changes that you made by marking tasks as Approved or Rejected. Once a lot is finalized, the tasks that you marked as Rejected will actually be rejected and sent back to Step A to be re-annotated. The tasks that you marked as Approved will have their statuses changed to Approved.
📘 Note
When a task is rejected, it is sent back to the annotator who originally worked on it. However, this only applies to the first step in the task — other steps will not be allocated to the original annotator.
To finalize a lot:
- In the row for a sample, click the arrow beside the View button and click Finalize.

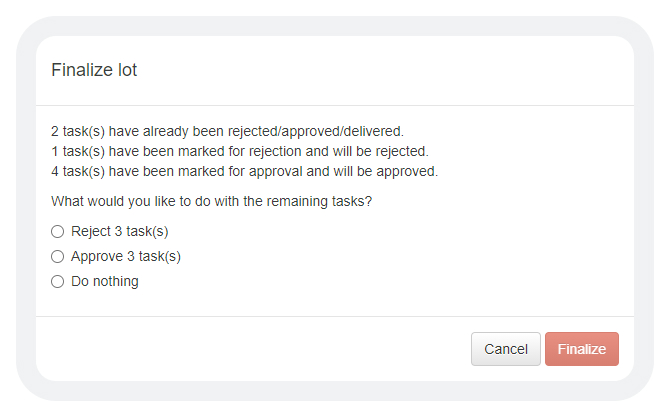
- In the Finalize lot window that appears, you may be prompted about what to do if tasks in the sample were neither approved or rejected.

- Click Finalize to confirm.
